
Solution Architect
1.8K posts

Solution Architect
@Tech_Code_Learn
Working Professional having 10+ years of experience in Java, Spring, SpringBoot, Hibernate, Microservices, AWS, Docker, Kubernetes Writer, Content Creator
شامل ہوئے Eylül 2023
197 فالونگ112 فالوورز
#Linux File System
Alex Xu@alexxubyte
Linux file system explained. The Linux file system used to resemble an unorganized town where individuals constructed their houses wherever they pleased. However, in 1994, the Filesystem Hierarchy Standard (FHS) was introduced to bring order to the Linux file system. By implementing a standard like the FHS, software can ensure a consistent layout across various Linux distributions. Nonetheless, not all Linux distributions strictly adhere to this standard. They often incorporate their own unique elements or cater to specific requirements. To become proficient in this standard, you can begin by exploring. Utilize commands such as "cd" for navigation and "ls" for listing directory contents. Imagine the file system as a tree, starting from the root (/). With time, it will become second nature to you, transforming you into a skilled Linux administrator. Have fun exploring! Over to you: which directory did you use most frequently? – Subscribe to our weekly newsletter to get a Free System Design PDF (158 pages): bit.ly/3KCnWXq
Polski
#API Security 🚀🚀🚀
Bytebytego@bytebytego
Top 12 Tips for API Security - Use HTTPS - Use OAuth2 - Use WebAuthn - Use Leveled API Keys - Authorization - Rate Limiting - API Versioning - Whitelisting - Check OWASP API Security Risks - Use API Gateway - Error Handling - Input Validation – Subscribe to our weekly newsletter to get a Free System Design PDF (158 pages): bit.ly/3KCnWXq
English
Alex Xu@alexxubyte
Top 5 Kafka use cases Kafka was originally built for massive log processing. It retains messages until expiration and lets consumers pull messages at their own pace. Let’s review the popular Kafka use cases. - Log processing and analysis - Data streaming in recommendations - System monitoring and alerting - CDC (Change data capture) - System migration Over to you: Do you have any other Kafka use cases to share? -- Subscribe to our weekly newsletter to get a Free System Design PDF (158 pages): bit.ly/3KCnWXq
QHT
Nelson Djalo | Amigoscode@AmigosCode
Instagram System Design Overview - Clients (iOS, Android, Web). - Microservices for varied functionalities. - Databases: MySQL, Cassandra, Redis. - Object storage (Amazon S3) & CDN for media. - Caching with Memcached/Redis - Scaling, load balancing, auto-scaling. - Asynchronous processing with queues - Secure authentication (OAuth), RBAC. - Monitoring (Prometheus, Grafana) & analytics. - Push notifications for real-time updates. 👍🏿 Subscribe to our newsletter - bit.ly/45ucZPf #systemdesign #coding #interviewtips
QHT
#ACID in Database
Saurabh Dashora@ProgressiveCod2
The acronym ACID in the context of DB transactions stands for Atomicity, Consistency, Isolation, and Durability. This post is going to make each term crystal clear. ✅Atomicity (A) Atomic means something that cannot be broken down. It’s the same thing that our Physics teachers tried to tell us many years ago. If only we would have listened… Atomicity describes what happens to a Transaction that’s executing multiple write operations and something goes wrong halfway. Think of a Transaction as a bridge between two states of data named A and B. No intermediate states are allowed. It’s all or nothing. So, if you can’t complete the entire transaction successfully, you don’t complete any part of it. The transaction is completely aborted. Without atomicity, a mid-way error during multiple updates, the entire database state can turn into a mess. Retrying the transaction would be risky because it can result in duplicate data. Atomicity saves you from all this trouble. ✅Consistency (C) Consistency in ACID is all about the context of your application. In any application or system, there are statements that must be true. For example, credits and debits in a bank must always be balanced. A consistent transaction is one where statements are true at the beginning as well as the end of the transaction. But most of it depends on your application. A database cannot save you if you write bad data that violates the invariants. Sure, you can have some checks like foreign keys or constraints but a lot of it depends on the application’s requirements. So - when you think about it, Consistency is the property of your application. ✅Isolation (I) Isolation is the trickiest guarantee. It’s a given that your database will be accessed by multiple clients at the same time. Databases can handle this quite well if they are reading and writing different parts of the database. But the plot thickens when different clients try to access the same database records. This ends up creating concurrency issues. An example of this issue is two clients simultaneously trying to increment a counter that is stored in a database. Despite two increment requests, the counter was only incremented by 1 because of race conditions. The goal of Isolation is that concurrently executing transactions are isolated from each other. But it’s more of a degree than an absolute value. There are multiple isolation levels ranging from weak to strong. Some common ones are: - Read Uncommitted - Read Committed - Repeatable Read - Serializable ✅ Durability (D) Lastly, the purpose of a database system is to let you store data without any fear of losing it. Durability is the guarantee that promises this safety. The guarantee holds even in case of a hardware fault or database crash. There are two ways databases achieve this: - Disk storage and write-ahead logs for single-node databases - Replication for multiple nodes. Of course there is no perfect durability. It’s all about risk-reduction techniques. So - what do you think about ACID guarantees? Do you prefer them or find them too strict?
Filipino
Sahn Lam@sahnlam
Caching 101: The Must-Know Caching Strategies Fetching data is slow. Caching speeds things up by storing frequently accessed data for quick reads. But how do you populate and update the cache? That's where strategies come in. 🔍 Read Strategies: Cache Aside (Lazy Loading) - How it works: Tries cache first, then fetches from DB on cache miss - Usage: When cache misses are rare or the latency of a cache miss + DB read is acceptable Read Through - How it works: Cache handles DB reads, transparently fetching missing data on cache miss - Usage: Abstracts DB logic from app code. Keeps cache consistently populated by handling misses automatically 📝 Write Strategies: Write Around - How it works: Writes bypass the cache and go directly to the DB - Usage: When written data won't immediately be read back from cache Write Back (Delayed Write) - How it works: Writes to cache first, async write to DB later - Usage: In write-heavy environments where slight data loss is tolerable Write Through - How it works: Immediate write to both cache and DB - Usage: When data consistency is critical 🚀 Real-Life Usage: Cache Aside + Write Through This ensures consistent cache/DB sync while allowing fine-grained cache population control during reads. Immediate database writes might strain the DB. Read Through + Write Back This abstracts the DB and handles bursting write traffic well by delaying sync. However, it risks larger data loss if the cache goes down before syncing the buffered writes to the database. – Subscribe to our weekly newsletter to get a Free System Design PDF (158 pages): bit.ly/496keA7
QHT
#Kubernetes Service Types
Alex Xu@alexxubyte
Top 4 Kubernetes Service Types in one diagram. The diagram below shows 4 ways to expose a Service. In Kubernetes, a Service is a method for exposing a network application in the cluster. We use a Service to make that set of Pods available on the network so that users can interact with it. There are 4 types of Kubernetes services: ClusterIP, NodePort, LoadBalancer and ExternalName. The “type” property in the Service's specification determines how the service is exposed to the network. 🔹 ClusterIP ClusterIP is the default and most common service type. Kubernetes will assign a cluster-internal IP address to ClusterIP service. This makes the service only reachable within the cluster. 🔹 NodePort This exposes the service outside of the cluster by adding a cluster-wide port on top of ClusterIP. We can request the service by NodeIP:NodePort. 🔹 LoadBalancer This exposes the Service externally using a cloud provider’s load balancer. 🔹 ExternalName This maps a Service to a domain name. This is commonly used to create a service within Kubernetes to represent an external database. -- Subscribe to our weekly newsletter to get a Free System Design PDF (158 pages): bit.ly/3KCnWXq
English
Bytebytego@bytebytego
Data Pipelines Overview. The method to download the GIF is available at the end. Data pipelines are a fundamental component of managing and processing data efficiently within modern systems. These pipelines typically encompass 5 predominant phases: Collect, Ingest, Store, Compute, and Consume. 1. Collect: Data is acquired from data stores, data streams, and applications, sourced remotely from devices, applications, or business systems. 2. Ingest: During the ingestion process, data is loaded into systems and organized within event queues. 3. Store: Post ingestion, organized data is stored in data warehouses, data lakes, and data lakehouses, along with various systems like databases, ensuring post-ingestion storage. 4. Compute: Data undergoes aggregation, cleansing, and manipulation to conform to company standards, including tasks such as format conversion, data compression, and partitioning. This phase employs both batch and stream processing techniques. 5. Consume: Processed data is made available for consumption through analytics and visualization tools, operational data stores, decision engines, user-facing applications, dashboards, data science, machine learning services, business intelligence, and self-service analytics. The efficiency and effectiveness of each phase contribute to the overall success of data-driven operations within an organization. Over to you: What's your story with data-driven pipelines? How have they influenced your data management game? – Subscribe to our newsletter to 𝐝𝐨𝐰𝐧𝐥𝐨𝐚𝐝 𝐭𝐡𝐞 𝐆𝐈𝐅. After signing up, find the download link on the success page: lnkd.in/eawsYGiA
QHT
Nelson Djalo | Amigoscode@AmigosCode
GraphQL Explained GraphSQL is a query language for databases that leverages the power of graph structures. 📊 It's all about relationships, making complex data queries a breeze. GraphQL itself is not tied to a specific transport protocol like HTTP. It's a query language and runtime for APIs. However, in most implementations, GraphQL is used over HTTP. The most common approach is to send GraphQL queries and mutations as POST requests to a specific endpoint on an HTTP server. While GraphQL can technically work over other protocols, like WebSocket for real-time communication, the HTTP-based approach is widely adopted and considered standard in many scenarios. It provides a simple and familiar way to integrate GraphQL with existing web infrastructure. Why it Matters: ✨ Declarative Queries: Fetch exactly what you need. ✨ Hierarchical Structure: Navigate data with ease. ✨ Relationship Emphasis: Ideal for connected data. ✨ Real-time Updates: Stay synced with subscriptions. ✨ Single Endpoint: Simplify API interactions. ✨ Introspection: Self-documenting for devs. 👍🏿 Subscribe to our newsletter - bit.ly/45ucZPf #systemdesign #coding #interviewtips
QHT
Dr Milan Milanović@milan_milanovic
𝗛𝗼𝘄 𝗚𝗜𝗧 𝗪𝗼𝗿𝗸𝘀 Git is a distributed version control tool that facilitates monitoring changes made to your code over time. Git makes it simple to track changes to your codebase and collaborate on projects with others. It was authored by Linus Torvalds in 2005 for developing the 𝗟𝗶𝗻𝘂𝘅 𝗸𝗲𝗿𝗻𝗲𝗹, with other kernel developers contributing to its initial development. It enables us to 𝘁𝗿𝗮𝗰𝗸 𝗰𝗵𝗮𝗻𝗴𝗲𝘀 𝗶𝗻 𝗼𝘂𝗿 𝗰𝗼𝗱𝗲 𝗮𝗻𝗱 𝗰𝗼𝗹𝗹𝗮𝗯𝗼𝗿𝗮𝘁𝗲 𝘄𝗶𝘁𝗵 𝗼𝘁𝗵𝗲𝗿𝘀, by working on a different part of a codebase. When we say distributed, we may think we have code on two locations, remote server and locally, but the story is a bit more complex. Git has three local storages: a working directory, a staging area, and a local repository. 𝟭. 𝗪𝗼𝗿𝗸𝗶𝗻𝗴 𝗗𝗶𝗿𝗲𝗰𝘁𝗼𝗿𝘆 - This is where you work, and your files live (also called "untracked"). All file changes here will be marked, and if they are not saved to GIT, you will lose them. The reason is that GIT is not aware of those files. 𝟮. 𝗦𝘁𝗮𝗴𝗶𝗻𝗴 𝗔𝗿𝗲𝗮 - When you save your changes with git add, GIT will start tracking and saving your changes with files. These changes are stored in the .git directory. Then, files are moved from the Working Directory to the Staging Area. Still, if you change these files, GIT will not know about them; you need to tell GIT to notice those changes. 𝟯. 𝗟𝗼𝗰𝗮𝗹 𝗥𝗲𝗽𝗼𝘀𝗶𝘁𝗼𝗿𝘆 - It is the area where everything is saved (commits) in the .git directory. When you want to move your files from the Staging Area to the Local Repository, you can use the git commit command. After this, your Staging area will be empty. If you want to see what is in the Local repository, try git log. Some basic 𝗚𝗜𝗧 𝗰𝗼𝗺𝗺𝗮𝗻𝗱𝘀 are: 🔹 𝗴𝗶𝘁 𝗶𝗻𝗶𝘁 -> Create a new git repo in the directory 🔹 𝗴𝗶𝘁 𝗯𝗿𝗮𝗻𝗰𝗵 -> Create a new local branch 🔹 𝗴𝗶𝘁 𝗰𝗵𝗲𝗰𝗸𝗼𝘂𝘁 -> Switch branches 🔹 𝗴𝗶𝘁 𝗮𝗱𝗱 -> Add a new file to your staging area 🔹 𝗴𝗶𝘁 𝗰𝗼𝗺𝗺𝗶𝘁 -> Adds staged changes to your local repository 🔹 𝗴𝗶𝘁 𝗽𝘂𝗹𝗹 -> pull code from your remote repo to your local directory 🔹 𝗴𝗶𝘁 𝗽𝘂𝘀𝗵 -> Push local repository changes to your remote repo 🔹 𝗴𝗶𝘁 𝘀𝘁𝗮𝘁𝘂𝘀 -> Show which files are being tracked (and untracked) 🔹 𝗴𝗶𝘁 𝗱𝗶𝗳𝗳 -> See the actual difference in code between your Working Directory and your Staging Area Along with GIT commands, you can try and use some popular 𝗚𝗜𝗧 𝘁𝗼𝗼𝗹𝘀: GitHub Desktop, SourceTree, TortoiseGit, Git Extensions, GitKraken, SmartGit, Tower, etc. #developers
QHT
Alex Xu@alexxubyte
Authentication in REST APIs acts as the crucial gateway, ensuring that solely authorized users or applications gain access to the API's resources. Some popular authentication methods for REST APIs include: 1. Basic Authentication: Involves sending a username and password with each request, but can be less secure without encryption. When to use: Suitable for simple applications where security and encryption aren’t the primary concern or when used over secured connections. 2. Token Authentication: Uses generated tokens, like JSON Web Tokens (JWT), exchanged between client and server, offering enhanced security without sending login credentials with each request. When to use: Ideal for more secure and scalable systems, especially when avoiding sending login credentials with each request is a priority. 3. OAuth Authentication: Enables third-party limited access to user resources without revealing credentials by issuing access tokens after user authentication. When to use: Ideal for scenarios requiring controlled access to user resources by third-party applications or services. 4. API Key Authentication: Assigns unique keys to users or applications, sent in headers or parameters; while simple, it might lack the security features of token-based or OAuth methods. When to use: Convenient for straightforward access control in less sensitive environments or for granting access to certain functionalities without the need for user-specific permissions. Over to you: Which REST API authentication method do you find most effective in ensuring both security and usability for your applications? -- Subscribe to our weekly newsletter to get a Free System Design PDF (158 pages): bit.ly/3KCnWXq
QHT
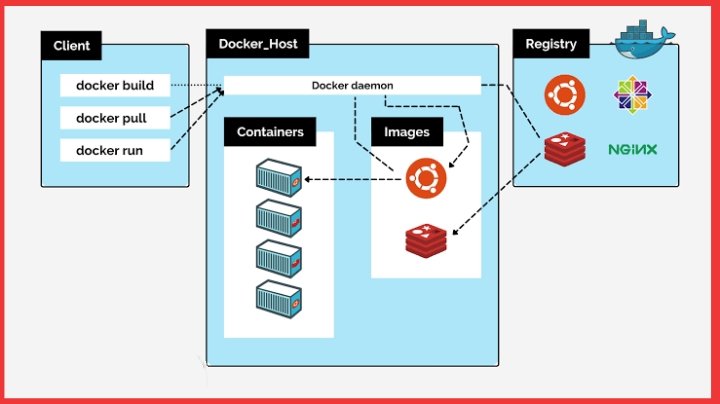
#Docker Containers
>Docker Containers contain binaries, libraries & configuration files along with the application itself
They don’t contain a guest OS which makes the containers lightweight
#JavaProgramming
#Java #InterviewQuestions
#100daysofcoding #Coding
English
#Docker
Docker uses virtualization to deliver software in packages called containers
#Containers are isolated from one another and bundle their own software, libraries & configuration files
#JavaProgramming
#Java #InterviewQuestions
#100daysofcoding #Coding

English
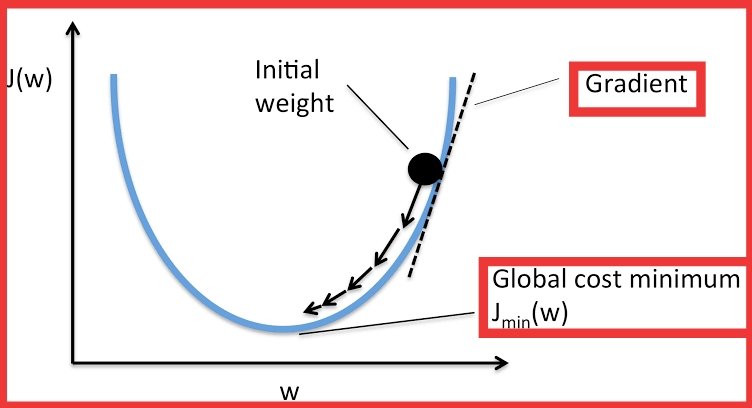
#GradientDescent
>Used in machine learning to minimize a cost function
>Algorithm is run with training data & errors on the predictions are used to update the parameters
#MachineLearning #AI
#JavaProgramming
#Java #Python #NeuralNetworks
#100daysofcoding #Coding
English
#SQL Joins
>Inner Join
>Left Outer Join
>Right Outer Join
>Cross Join
>Full Outer Join
#JavaProgramming #DBMS
#Database
#Java #InterviewQuestions
#Concepts #coding
#100daysofcoding

English
#AI vs #ML vs ##NN vs #DL
>AI is a bigger concept covering
all the other three
>Machine Learning is a subset of AI
>NN is a subset of ML
>DL is a subset of NN
#JavaProgramming #SQL
#Java #InterviewQuestions
#Concepts #DBMS
#100daysofcoding #Coding

English
There are three main ways to train LLMs
>casual language
>sentence classification
>token classification
#LLM
#llms #largelanguagemodel #GenerativeAI #Java #Sorting
#InterviewQuestions
#JavaProgramming
#Concepts #coding
#100daysofcoding

English
#MachineLearning
Algorithms 🚀🚀🚀
#DataStructure #AI
#JavaProgramming
#Java #Python #NeuralNetworks
#100daysofcoding #Coding

Català