Curious about options trading but never tried it? You can test everything on a free demo first and see how the platform works. Start here: u3.shortink.io/cabinet/demo-q…
Curious about options trading but never tried it? You can test everything on a free demo first and see how the platform works. Start here: u3.shortink.io/cabinet/demo-q…
Curious about options trading but never tried it? You can test everything on a free demo first and see how the platform works. Start here:u3.shortink.io/cabinet/demo-h…
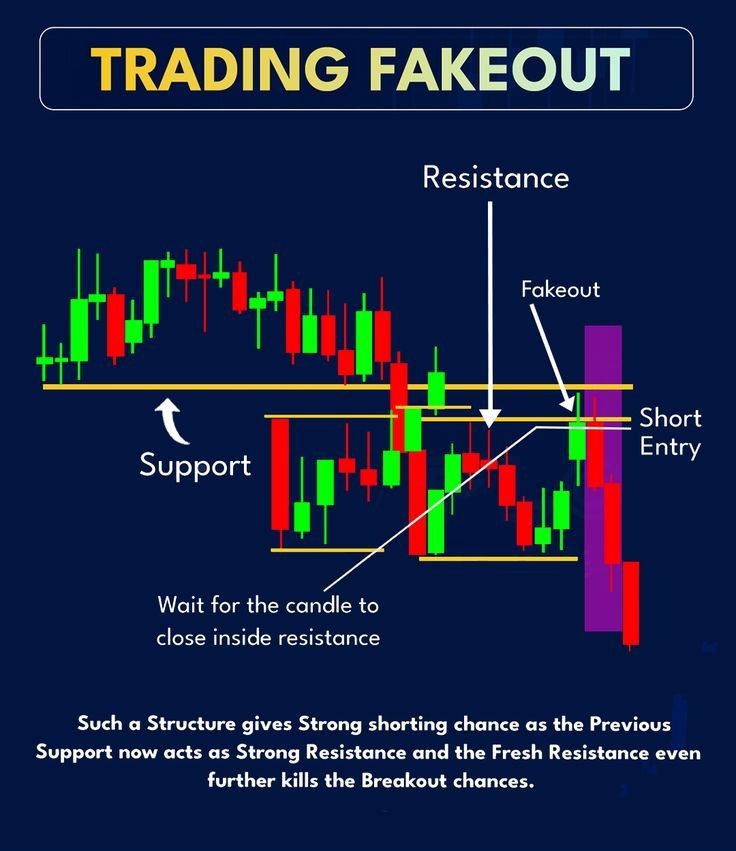
This is a classic fakeout trap that wipes out breakout traders.
Price pushes above resistance, giving the illusion of a breakout. Retail jumps in long. But instead of continuation, the candle closes back inside the resistance zone. That’s the tell.
Previous support flips into resistance. The breakout fails. Liquidity gets taken. Then momentum shifts hard to the downside.
Key elements in this setup:
Clear resistance level
Break above it (fake breakout)
Close back inside the range
Short entry after confirmation
Strong downside expansion
The important part isn’t the wick — it’s the close. A close back below resistance shows rejection, not strength.
Breakouts fail more often than people think. The real edge comes from trading the failure, not the breakout.
This setup highlights something most traders ignore: volume tells the real story.
Price keeps respecting a descending trendline resistance. Every push up gets rejected… until we see a clear shift — rising volume building into the level. Then comes the breakout candle with a major volume spike.
That spike matters. Breakouts without volume often fail. Breakouts with expanding volume show participation and commitment.
Key takeaways:
Trendline resistance defines the battlefield
Rising volume = increasing pressure
Volume spike at breakout = confirmation
Low volume breakouts = high failure probability
But here’s the real question:
Are you buying the breakout… or waiting for the retest to avoid getting trapped?
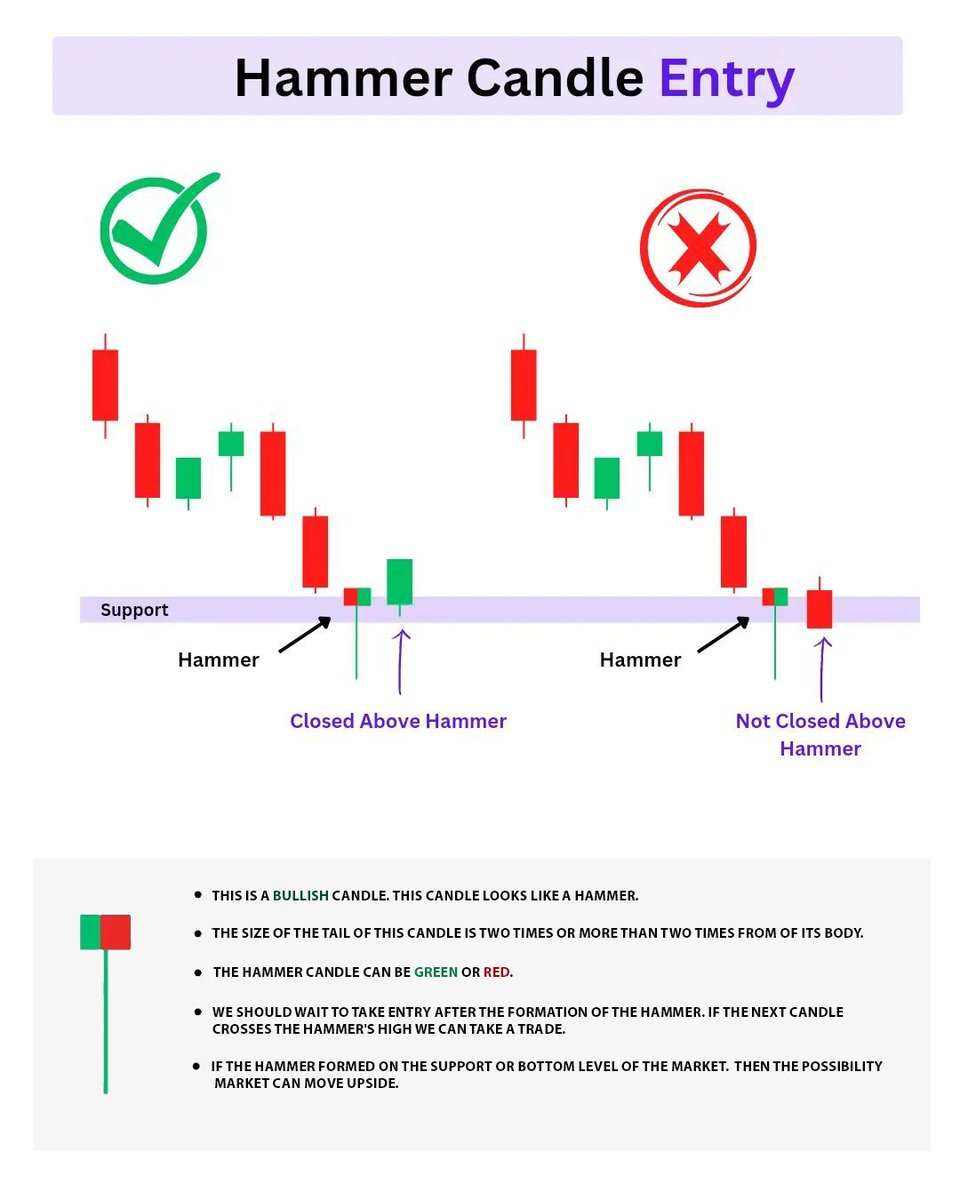
Most traders see a hammer and instantly go long.
That’s why they keep buying dead bounces.
What the image actually shows:
• A hammer at support is only potential strength
• The wick shows rejection — not control
• Control is proven only when price closes above the hammer
• No close above = sellers still in charge
Rules that matter:
• Location first (support / demand)
• Wait for confirmation close
• Enter on follow-through, not the hammer itself
• If price can’t hold above it, you don’t belong in the trade
A hammer is the market saying, “maybe.”
The next candle decides “yes” or “no.”
Trade confirmation — not candle shapes.
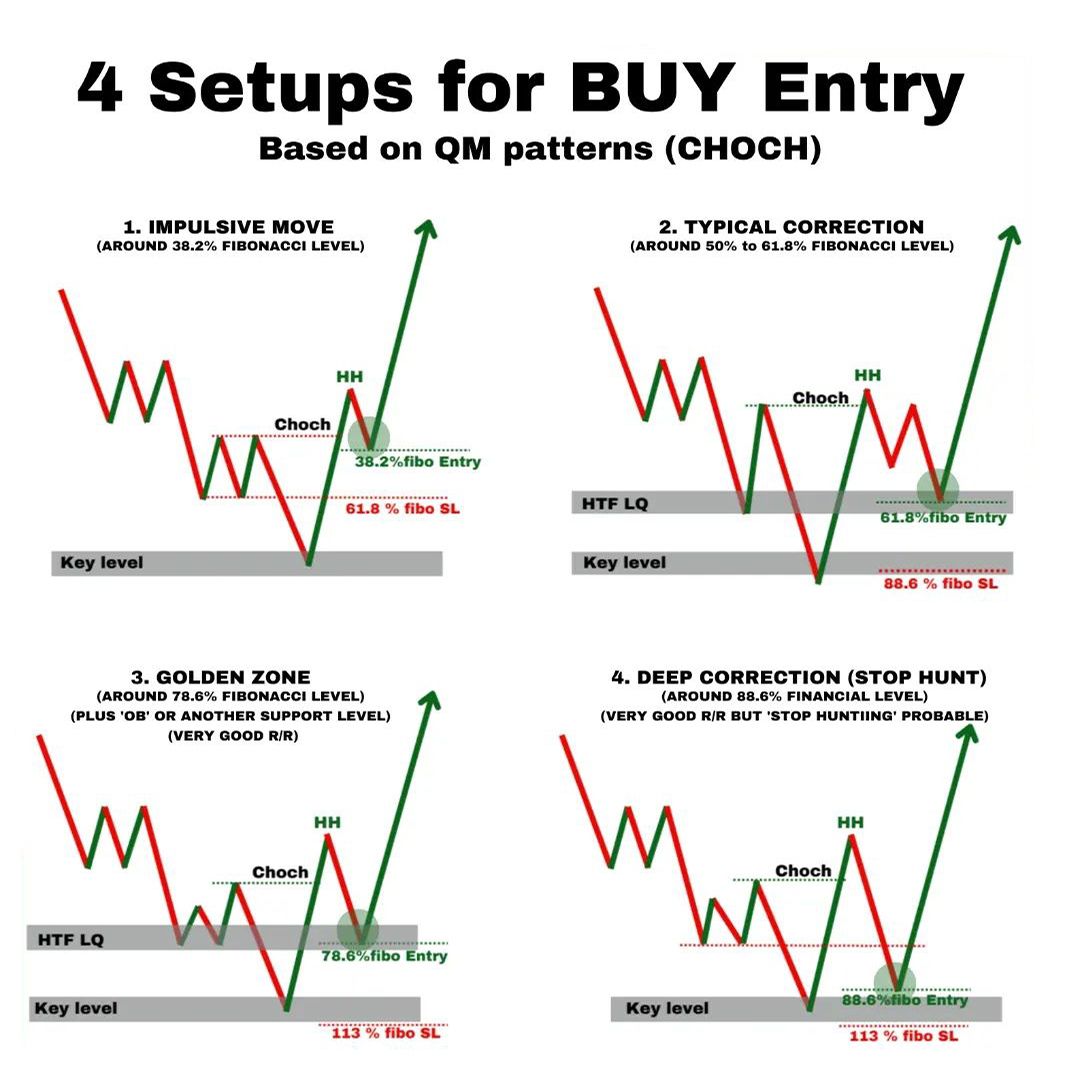
People treat Fibonacci levels like magic numbers.
They’re not.
What actually makes these buy setups work isn’t 38%, 50%, or 78%.
It’s CHoCH + location + liquidity.
The four scenarios are just different depths of the same correction:
• Shallow pullback = strong trend
• Mid pullback = healthy continuation
• Golden zone = best R:R, lower win rate
• Deep pullback = stop hunt, high risk
The mistake:
• Buying every fib level blindly
• Ignoring HTF liquidity
• Entering without structure shift
Fib only helps you time an entry — it never gives you permission.
No CHoCH → no trade.
Numbers don’t pay you.
Structure does.
Most traders treat Elliott Waves and harmonic patterns like a crystal ball.
That’s why they keep redrawing counts after price invalidates them.
Reality check:
• Waves don’t cause moves — liquidity and structure do
• Harmonic patterns fail constantly without HTF context
• Multiple “valid” counts = zero edge by itself
• If you need to relabel after every candle, you’re guessing
This image is useful only for one thing:
Understanding where reactions are more likely — not what must happen.
Elliott Waves work when:
• Trend and structure already align
• You’re at a meaningful location (supply/demand)
• Liquidity has been cleared
• Risk is clearly defined
If your bias depends on a perfect count,
the market will humble you fast.
Use waves as a framework, not a forecast.
Price decides — counts follow.
People see price go up and immediately look for a short.
That’s why they keep getting squeezed.
This image shows the only sell zones that actually make sense:
• Supply reversal — trend exhaustion, not prediction
• Supply continuation — pullback in a downtrend
• Order block — origin of displacement, not a random box
• Breaker block — old support flipped after stops are taken
What doesn’t work:
• Shorting green candles
• Selling “because it’s high”
• Entering before liquidity is cleared
Sell zones work only when context agrees:
Trend → structure → liquidity → zone → entry.
Miss one step and you’re guessing.
The market doesn’t reward anticipation.
It rewards confirmation.
This image is useful — and dangerous.
Useful if you understand context.
Dangerous if you think patterns work in isolation.
Hard truth:
• Patterns don’t predict — they react
• The same pattern can fail or work depending on trend, liquidity, and structure
• Copy-pasting entries from a cheat sheet is gambling, not trading
• Most losses come from trading patterns against higher-timeframe direction
What actually matters more than the shape:
• Trend direction
• Location (premium/discount, supply/demand)
• Structure breaks
• Liquidity sweeps
• Risk management
Patterns are just labels for behavior.
If you don’t understand the behavior, the label won’t save you.
Use cheat sheets to study, not to execute.
Otherwise you’re just memorizing shapes while the market takes your money.
Most losses don’t come from bad entries — they come from trading the wrong direction.
A downtrend isn’t complicated:
• Lower highs + lower lows
• Pullbacks fail at resistance
• Breaks happen with volume
• Channels and flags resolve downward
• Indicators only confirm what structure already shows
If you need ten indicators to tell you the trend, you’re already late.
Structure > tools.
Direction first, strategy second.
Trade with the trend or prepare to fight the market — and lose.
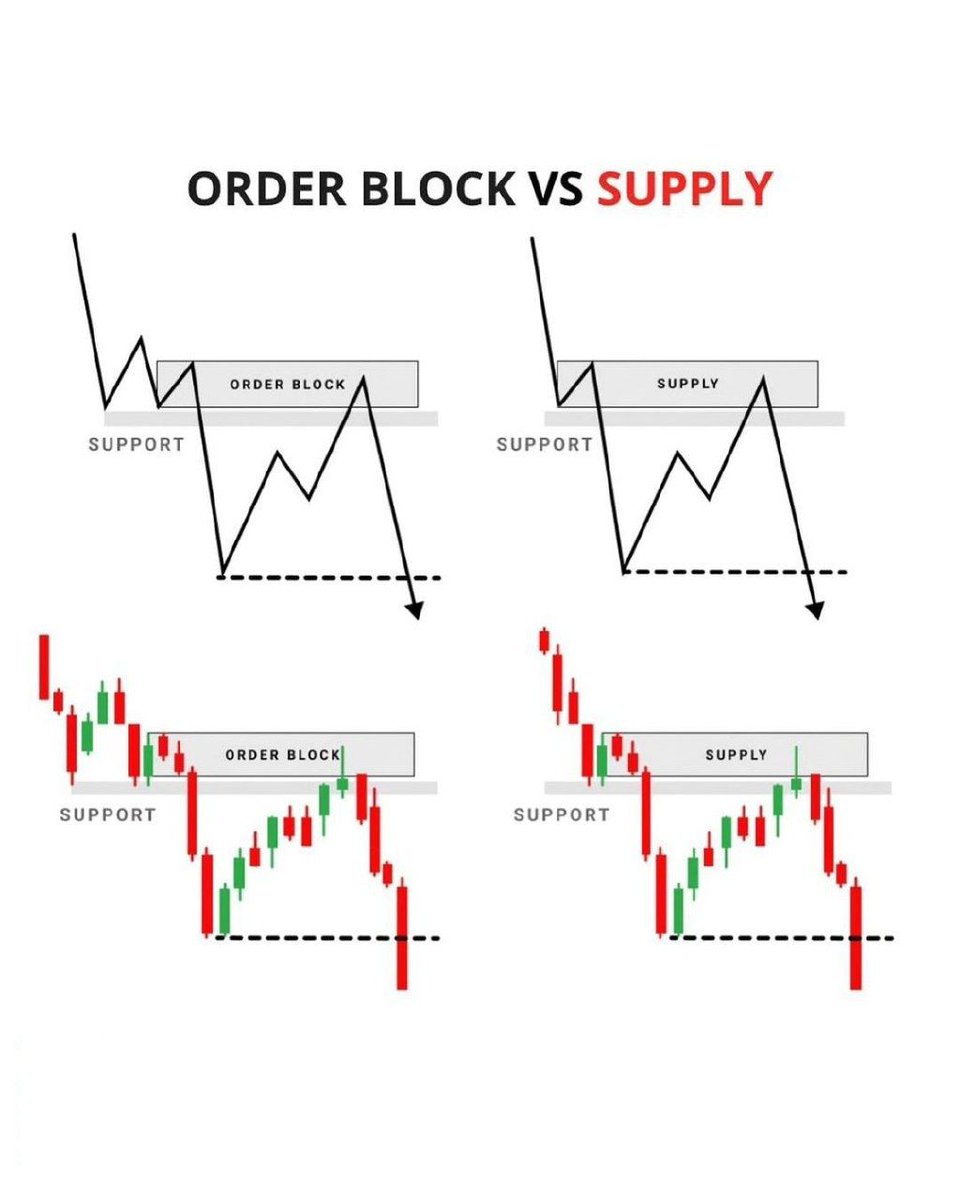
Most traders slap a box on the chart and call it an order block.
That’s why they keep getting stopped.
The difference matters:
• Order block = the origin of a strong displacement
• Supply = an area where sellers previously reacted
• Not every supply zone is an order block
• Treating them the same kills your edge
Order blocks work because institutions left unfilled orders there.
Supply zones work only if price shows rejection again.
If price slices through the level, it was never an order block — just a line you hoped would hold.
Stop labeling.
Start reading reaction and displacement.
Accuracy pays.
Hope doesn’t.
A downtrend isn’t random red candles. It’s a repeatable sequence — and most traders ignore it.
What’s happening here:
• Price breaks down → structure shifts
• Pullback into an order block / supply
• Retest fails
• New low prints
• Market consolidates → continues lower
Where most people screw up:
• Buying pullbacks in a downtrend
• Shorting too late at the lows
• Ignoring supply and structure retests
The edge is simple:
Trade the retest, not the panic.
If supply holds, continuation is likely.
If it doesn’t, you stay out.
No prediction.
No hope.
Just structure doing its job.
This image sells a half-truth that gets people broke.
Reality:
• A 9–5 isn’t the enemy — ignorance is
• Trading doesn’t magically replace work
• If you can’t manage risk, money won’t “work” for you — it will disappear
• Most people quit jobs before they build skill, capital, or discipline
The real hierarchy:
Learn → while you still have income
Build capital → slowly, boringly
Prove consistency → years, not weeks
Then scale
Money only works for people who know how to control it.
Everyone else ends up working harder trying to escape work.
Escape fantasies are expensive.
Systems and patience are not.
Most traders short the breakdown and then panic when price pulls back.
That pullback isn’t a mistake — it’s the setup.
What this image shows:
• Structure breaks first
• Price always comes back to test something (supply, structure, or a double top)
• That retest is where risk is defined
• The real sell happens after price proves resistance holds
If you’re shorting the initial break, you’re late.
If you’re shorting the retest, you’re aligned.
Break first.
Retest second.
Entry last.
Anything else is impatience dressed up as strategy.
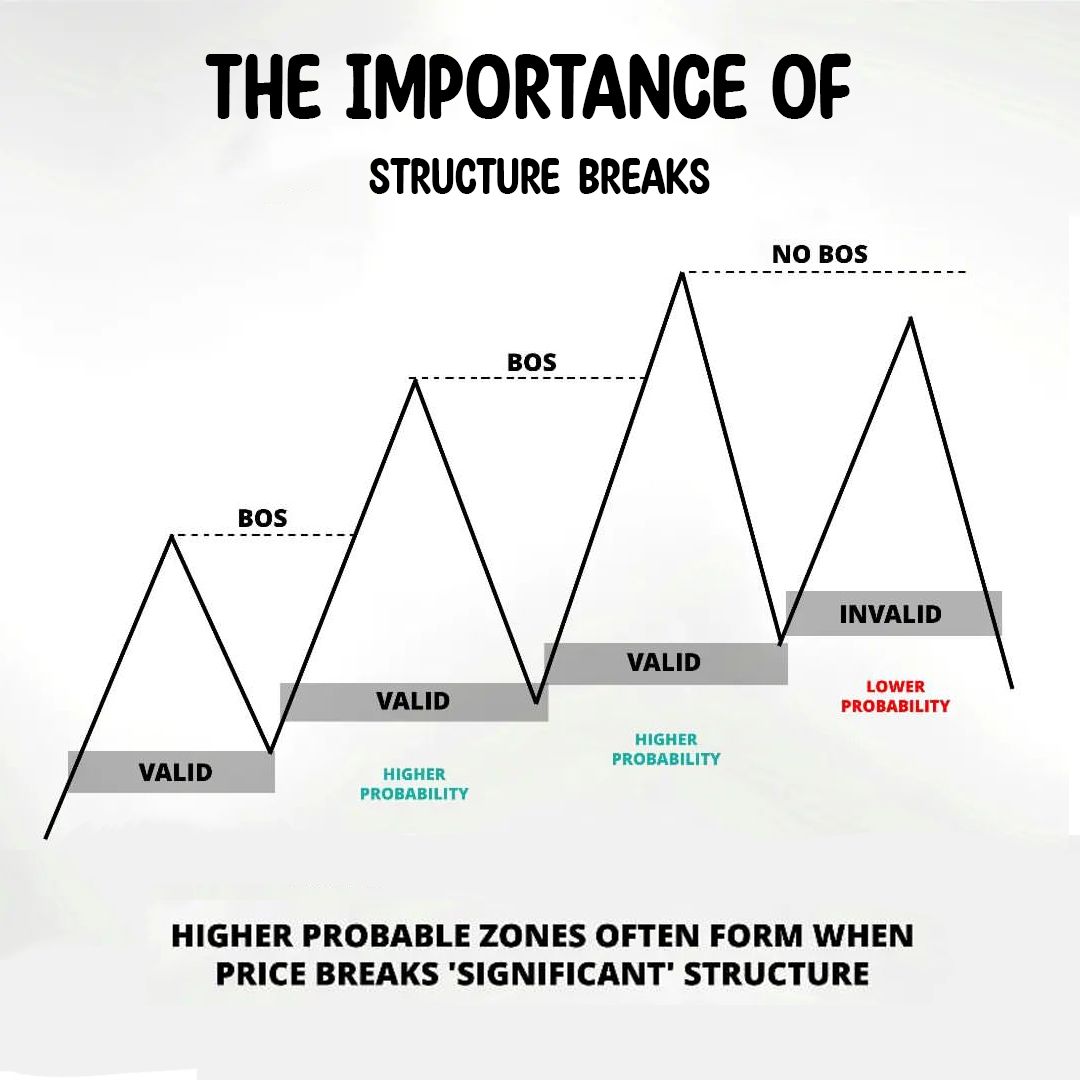
Most traders enter way too early because they think structure broke.
It didn’t.
This chart shows the difference:
• Valid trades happen after a clear BOS (break of significant structure)
• That’s where probability actually shifts
• No BOS = continuation risk is still high
• Late or weak breaks = lower probability, more chop
If you’re buying or selling without a confirmed structure break, you’re guessing — not trading.
Wait for price to prove intent.
Structure first, entries second.
Anything else is just gambling with lines on a chart.
Retail traders obsess over textbook patterns — head & shoulders, double tops, “perfect” breakdowns — and then wonder why price instantly reverses.
Top examples show what not to do:
• Shorting the pattern
• Entering at obvious levels
• Putting stops where everyone else does
Bottom examples show the only thing that actually matters:
• Wait for price to raid liquidity
• Let the pattern fail
• Enter from the order block
• Trade from imbalance, not emotion
Patterns are just bait.
Structure is the execution plan.
If you trade what looks obvious, you become obvious.
And obvious traders pay the bills for the market.
Everyone claims they “caught the bottom,” but most of them are just gambling.
A real counter-trend entry has structure behind it — not hope.
This chart explains what actually matters:
Market is trending down
Liquidity gets cleared on the lows
First CHoCH (change of character) shows momentum slowing
Supply zones keep failing as price climbs
Demand holds — that’s your clue
Second CHoCH confirms bullish intent
Only then do you have a valid reversal entry
If you’re buying the first touch of demand without confirmation, realize this:
You’re betting against trend, smart money, and probability — and the market owes you nothing.
The reality:
Counter-trend trades work only when price proves it deserves your money.
Let it break structure, show intent, and hold demand — then you trade.
Stop buying blind bottoms.
Wait for proof.
Confirmation protects your account — ego blows it up.
Most retail traders think a wedge breakout is a green light to go all-in.
Wrong.
It’s the exact spot where smart money is waiting to unload bags onto them.
Here’s the sequence almost every time:
• Price climbs inside a wedge
• Retail sees higher lows → assumes bullish continuation
• Stops stack above the wedge
• Breakout candle appears → masses FOMO long
• Price makes a slightly higher high just to sweep liquidity
• Big players dump into the crowd’s breakout entries
• Market reverses and nukes everyone who bought late
If this pattern keeps destroying you, the problem isn’t the market.
You’re chasing what everyone else is chasing — and you’re getting used as exit liquidity.
Want to flip the script?
Stop buying the breakout.
Wait for the sweep and the failed break.
Enter only when the breakout doesn’t hold — that’s where the real move begins.
Trade against the crowd — or become part of it.